Showing posts with label Crafting. Show all posts

Saturday, October 5, 2013

Resurrected-An Old Post With 500 Hits-DIY Pumpkins

My kind of DIY craft & tutorial!
Cheap, Fast and Awesome!
I'm Hooked!

Go to a store with great bargains~
Buy some cheap, fake, ugly, mini pumpkins.
Go to Jo Ann's and buy a can of copper~
spray paint behind the locked cabinet doors.

Spray the pumpkins, or better yet
have your awesome hubby do it!

From Crass to Class in 120 seconds!
They really are pretty...

It would be fabulous on walnuts, pods or pine cones also!

Enjoy in numerous ways.

If you want some but don't want to store them...
buy the real mini ones at the grocery store and toss
after the autumn festivities.

They would make great place markers at Thanksgiving.
Just prop a cute little name tag against the stem.

I like  the different shapes!

In case you can't stop over for dinner! 
Click Click for a closer look...

I promise our walls are NOT lime green,
not sure why they are coming out
this way with our new camera!

Friday, November 30, 2012

Faux Snowballs Tutorial


I think I need some faux snowballs for my decor this year.  I went on Google and found this blog post.  This looks like a fun blog to follow.  Check it out sometime. 

Via Charlene's  blog.  http://charsethman.blogspot.com/2008/10/tuesdays-tutorial-faux-snowballs.html

  Charlene writes:

"Here's one of my favorite Christmas Time Bowl Fillers/Ornies! You can keep these out for the whole Winter Season too. I like to just fill up bowls with these snowballs....you can even place them outside in a pail or basket!!! These are so much fun and are great Craft Show Sellers! Just tuck a few into a cellophane bag tied with some homespun and a tag marked "Snowballs for sale!" and the customers just love them! The best part is...you can make tons of these at one time! Hope you Enjoy!

Faux Snowballs
Supplies:

*Various sized Styrofoam Balls (found at $ tree)
*Joint Compound (can be found at Walmart or any hardware store in small tubs)
*Spatula, Large popsicle stick, or butter knife
*Freezer Paper or Aluminum Foil
*Plastic Gloves
*Sandpaper (fine grit works)
*Spray Adhesive
*Glass Glitter or "Crystal Clear" Glitter (this is the snow colored glitter)
*Spray Sealer (I buy the Walmart brand “Color Place” with clear lid)
*Optional: Gloss Mod Podge if placing snowballs outside

Photobucket

Directions:

First, Take your Freezer Paper and lay out a sheet for you to put your completed snowballs on to dry. Now, take your Styrofoam Balls and roll them around on a hard surface to just kinda condense them some. This will also make them more of an uneven surface like a real snow ball. Just don’t smoosh them totally!!!!...LOL 

Photobucket


Now, put on your gloves, this is messy and you will want these! Next, take your Joint Compound and with your spatula start spreading this all over your Styrofoam balls. Smooth in some spots and leave peaks in others. This is just the part that you will play around with it til it is just the way you want it. Sit each snowball that is finished onto your freezer paper to dry OVERNIGHT. As you see in the picture, these are very dark looking in the beginning. However, as these dry they will lighten up to a nice white color. That is one way of knowing when they have completely dried.

 
Photobucket


Now, take your sandpaper and lightly sand down some of the peaks and areas that you are not really pleased with. (I usually don’t sand much, I kinda like the ruff look of them.)Once this is done and you have it where you like it, time to complete your snowballs!

Take your spray adhesive and give a nice light but good spray all over your snowball. Over a piece of paper sprinkle your snowball now with your Glass Glitter or Crystal Clear Glitter. This is the part that makes your snowball just glisten like a real snowball!!! Lay each one aside to dry just for a few minutes. Now to seal them so the diamond dust stays on them permanently. You will now take them to a well ventilated area and just lightly spray them with your spray sealer. One coat of this works just fine. You now have beautiful never melting, faux snowballs!!!

If you are going to be setting them outside....i recommend coating them with the Gloss Mod Podge FIRST, then sprinkling them your Glass Glitter or Crystal Clear Glitter. This just ensures them to be able to withstand the weather.

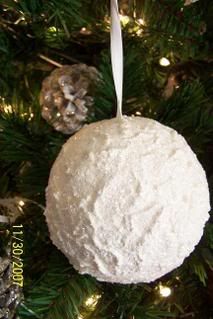
Here is an example of one I made for my tree last year. I inserted a piece of ribbon into my styrofoam and hot glued it in so I could hang them on my tree as Ornies.

Photobucket

Grungy Snowballs Option:

Into your Joint Compound mix you can add small amounts of coffee grounds, Spanish Moss, Straw, or small pieces of sticks. Just like if you were outside rolling a snowman, he always has grass and some dirt in him!

After sprinkling with your Glitter, sprinkle LIGHTLY with cinnamon as well. Just remember a little goes a long way! So sprinkle lightly!!!"


I hope you will go over and see this blog.  I hope she doesn't mind that I reposted the entire post so I won't lose the directions.  I am definitely going back to see what other great ideas she has.  All photos and text are from Charlene's blog post.

Thursday, April 28, 2011

Spring Break~Girls' Day


I have already posted several of the fun things we did when the girls came to visit for 8 days over their spring break. I still have a few more posts to do. I love that by going to the edit page and selecting options on the bottom you and change the date and put them in correct order when the entire week long event is finished. I just somehow ran out of time before the whole vacation was finished but eventually it will all run in a sequence on the blog. Magic! I also did the same thing on a few days of our New England vacation but I may never get to those. It is really hard to go back but having an accurate and complete record is the motivator.

The first full weekday they were here Jim designated as "Girls' Day!" He wanted to go to work at the Temple so he micro managed "highly suggested" this should be our craft, baking and shopping day! Isn't he clever in having us do the things he wanted to pass on, while he was gone? Of course we had to schedule out each day so we could fit everything in and keep the girls from getting bored.

These look a lot better and
smoother when they are done.


So we did crafts first thing on Monday morning. We made the tissue eggs and that was a lot of fun and took a few hours. Jen brought all the crafty stuff then Grampa boiled the eggs the night before and had them all ready to work on. He wanted to be sure his agenda items happened while he was away! By the end of the day he had over booked us and we were exhausted! Haha!

Back to the eggs...No cracks in the hard boiled egg is the key to making them last a long time. I have some I made many years ago. The yoke and white dry up something like the inside of a gourd.

Jen also brought fun things for the little girls to work on that were not as time consuming. This is the foam egg Hazie decorated with foam stickers. Chloe made one too but Hazie is the one I can always find sitting quietly when it is time to take a picture. Chloe is a moving target! LOL! It is funny how little kids run everywhere they go until one day they don't. Chloe can still be heard running around the house from room to room. I find that so interesting that one day they just stop doing that. She will be six in May but she still does it.

These eggs you are seeing above and this Mr. and Mrs. egg are in process. Since you are putting something flat on a curved surface you have to finesse the paper with gluing and drying and pressing it down and gluing some more. The girls did some and Jen and I did too. They were pretty cute when all finished. We meant to spray glitter them but ran out of time and energy by the end of the week.

The big girls made Easter cupcakes and cleaned up their mess! Yay! Jen and I finished up the egg and craft projects and cleaned up that mess! We were busy little beavers that morning.

This is what Hazie did!

Doing the decorating later in the afternoon!

So cute! Dessert for dinner!

Well maybe the big sisters let
Hazie try one before dinner!

We were expecting Great Grandma Gloria over for a taco dinner and a bonfire to roast marshmallows and tell ghost stories outside. It was a plan devised by Grampa and Piper.

In the afternoon we went to Stoneridge Mall in Pleasanton and looked around, did girl things and saw their Easter displays.

We took these photos because the store front window
was so pretty as a background.

Some of the mall displays.

So Sweet!


The girls had a little bit of money to spend and this Beauty Mask is what Chloe bought with hers. Love the hair's new arrangement! She wore it all day long! She had this one front tooth on the top hanging by a thread all week. Look what happened on their way home!

After dinner we went outside for the bonfire. Somehow I missed getting any pictures of Grandma Gloria with the kids. I think it was because she wasn't feeling too well at all and didn't stay too long after dinner.

Toasty warm and ready for the spooky stories.
I thought those were for Halloween but what do I know?
I found it interesting that one of the spooky stores involved
someone receiving scary texting on their cell phone.
Times have changed, huh?

What happened to the one where the girl's
head fell off and rolled down the stairs
when she took off her neck scarf?
Remember that one?

The yummy part!

We had a fun night outside. The spookiest thing was the frogs that serenaded us with such loud croaking it was overwhelming you could barely talk over them. And several times I tried to record it and they would immediately stop croaking when I would start. There were so many and they were so loud and we have never seen a frog in this yard. Where they were hiding is a mystery all together because they sounded like they were right beside us. I felt like all their eyes were on me when I would silently touch my camera to record! Spooky for sure.

This was the best I could catch on video!

Cacophony of Frogs and Humans...


Saturday, June 26, 2010

My Semi-Annual Project

OK, here is my kind of project....

The porch with my new purchase.

Yesterday morning Maureen and I made our monthly pilgrimage to Room with A Past. This is one of the most fun places to find treasures because it is run by a bunch of women who love to shop and then sell after a time. It is kind of like fishing. Catch and Release! So when they get rid of their cool stuff they load it in the car, after having dolled it up or whatever, and off it goes to their monthly sale.

Maureen and I were saying we'd love to be a fly on the wall and see how much trading goes on before the doors open among these awesome ladies of exquisite taste. The best part of the whole deal is they do not try to gouge you with their prices. I paid $14.00 for this large plaque. I know my prices and this was a lovely steal! They understand the obsession and are just trying to help out like-minded women who love to build their nests on an on-going basis.

So I bought this awesome plaster piece yesterday and wasn't quite sure where to put it. But where there is a will there is a way, right? After carrying it from room to room I decided on the front porch because it has such a gardeny flair to it. There was just one little problem with it out there...white walls. So I decided to give it a saffron (name of paint color) wash to give it a bit more color to contrast with the white siding on the porch and to accent the pillows and flowers out there.

Starting time as seen above.

I took some of our bedroom paint
and thinned it with water.


Slapped some paint on the edges and then
the front of it and then quickly rubbed it off .
It was very fast and very forgiving~love that part!

It was dry from all the rubbing so
I threw it back on the wall & Voila!

Cleaned up the mess~
the hardest part was getting
the paint off my hands.
I am a mess when I paint.
To save my cloths I painted in my undies!

Done!
And now you know why I could not have sat and made all those tiny boxes for the jelly beans and tied bows on them for the party. Attention span...20 minutes for anything crafty. But this is my third post today and I could sit and blog day and night if I didn't have anything else to do. This was a nice distraction from my toothache...now off to the recliner for that movie.